Sunday, November 15, 2009

Thanksgiving Craft

Well, it's that time of year again. And if you think I'm referring to Christmas carols, breathtaking snow scenes and joyful family gatherings, then we've never met! No, I'm referring to the constant complaints from certain children that 'there's nothing to do,' 'everthing here is boring,' and 'I wish I had different parents.' Or maybe that's just me...

At any rate, here's a cute craft that should keep the kids busy for an hour or so -- and if you're lucky their fingers will stick together with the tacky glue and this will keep them busy for another hour, or so! :-)

Any way, here's how to make some cute napkin rings to grace your Thanksgiving table. You will need:
paper towel or toilet paper tubes
Tacky Glue (you have to use the stuff called 'Tacky Glue', regular Elmer's Glue won't work)
a foam paintbrush
different kinds of dried beans

First, cut the tubes into slices about 2" wide, or so. I used a big bread knife for this.

Then, slather the tacky glue all over the outside of the cardboard tube.

Arrange beans in patterns, or just roll the gluey tube through a plate of beans. We tried it both ways and thought each was cool.

You could also decorate these with buttons, sequins, foam shapes, feathers, fabric, or beads.

Here's Addie concentrating hard on creating her first napkin ring.


Here are a few of our napkin rings, drying on a newspaper.


A finished napkin ring. We can't wait to take these to the farm for Thanskgiving!


Friday, October 30, 2009

Ixnay on Ristmas-Chay

So, yesterday was our neighborhood's trick-or-treat night. Since this is the first year that Buckey really could understand the concept, I took some time yesterday morning to tell him about it...that he'd get dressed up in his vampire costume, take his pumpkin bucket to our neighbors' houses, knock on the door and yell, "Trick or Treat!" and then people would put candy in his bucket.

For the next seven hours, Kiefer followed me around the house with his empty trick-or-treat bucket, repeating, "I want candy!" *sigh*

I guess this means that it's Ixnay on Ristmas-Chay until the morning of! (For those of you not well-schooled in the fine art of Pig Latin that translates literally to "Nix Christmas," which means I better not tell him about a guy coming down the chimney and leaving trucks and diggers under the tree until Christmas morning.)

Silly kids! Here's our vicious, blood-sucking vampire at his preschool Halloween party:
Here's our wicked witch, who had just been given the go-ahead on trick-or-treating:

Both kids on our front porch at one minute till 6 (the official start of trick-or-treating):

Happy Halloween!

Monday, August 31, 2009

Patchwork-Trimmed Baby Blanket

My cousin and his wife welcomed the newest baby to our family in June. I am just now getting around to crafting a gift. Sorry, baby Ramsey! Anyway, I decided to make a blanket with a patchwork edge. Here's what I came up with...


Closer view of the various patterns used:


Finished dimensions are 34" x 37".
Time to complete: under 90 minutes.

Here's how:
Get a square of fleece, 1/4 yard each of 4 coordinating flannels and matching or contrasting thread.

Cut two of the flannels in half (parallel to the selvedge edge).
Cut one of the flannel into fourths.
Leave one of the flannels uncut.

Arrange the flannels to your liking. Sew them together with a 3/8" seam allowance. Press the seams open or to one side.

You should have a rectangle of fabric. You are going to cut this fabric into strips perpendicular to your seam lines, so you need to have a straight edge to start with. I used a rotary cutter and mat to square up and slice a straight line. Then I cut six strips each 6" wide.

I folded them in half and ironed them. Then I placed the fleece inside the flannel trim right up to the fold line and pinned in place. Using a fairly tight zig-zag stitch, I sewed along the flannel edge. I wasn't too concerned with perfect neatness, but I made sure to sew all edges down, since I didn't hem the trim.

That's it -- a funky fleece baby blanket!

Thursday, August 27, 2009

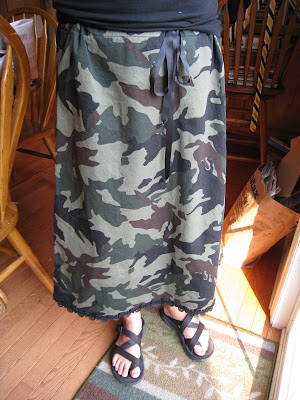
Camouflage drawstring skirt

For the past several months I've been looking for camo pants, shorts or skirts. Obviously, camo is not "in" this season -- or maybe even this decade -- surely I don't know! At any rate, on a recent trip to my local Jo-Ann Fabrics, I spotted some bolts of camouflage and bought a few yards of this fabric, a pack of black twill tape and some black lace-type trim. I drew up a pattern for a basic A-line, drawstring skirt and created this baby...
A close-up of the hemline:
It's a great summer skirt, paired with my ever-present Chaco sandals and a black tank. But I can't wait for fall to wear it with boots and a chunky sweater.

Wednesday, August 5, 2009

Fabric+Sewing Machine+1 Hour = Cute Skirt

Got a yard or so of fabric (for a kid-size skirt), a sewing machine and about an hour? If so, you could make this!

You will need: fabric, measuring tape, scissors, thread, 1/2" wide elastic, sewing machine


It's ridiculously easy and NO pattern is needed. First, you need a willing subject (or someone who has to be willing because you are THE MAMA!). Measure that subject's waist or hips (whichever is wider) and add about 4" for kids and 5" - 7" for adults. We'll call this number "A."

Cut fabric for the top tier 5" x A
Cut fabric for the second tier 5" x 1.5 times longer than first tier (multiply the measurement of the first tier by 1.5)
Cut fabric for the third tier 7" x 1.5 times longer than second tier (multiply the measurement of the second tier by 1.5)

For adults you'll probably want 5 or 6 tiers, so if you are making an skirt for an adult, just keep increasing the length of the additional tiers by 1.5. You may have to sew several strips together to get the required length. I didn't have to do this until the third tier on this skirt, but if I was making one for myself only the top tier would be made of a single strip of fabric.

After you have your tiers cut out, make an elastic casing in the first tier. Turn under the top of the first tier 1/4" to the fabric's wrong side and press. Then turn under another 3/4" and press. Sew very close to the edge of this fold the whole length of the fabric to make the "tube" for the elastic.

Then take the second tier and baste a wide stitch along whichever side will be the top. Then pull on one thread to gather it so that it is the same length as the bottom of tier one. Distribute the gathers as evenly as possible, pin the right sides together and sew the pieces together with a 1/2" seam.

Do the same thing for the rest of the tiers. NOTE: Before you gather and attach the bottom tier, hem it first. Do this by turning 1/4" to the wrong side (press) then turn another 1/4" under to the wrong side and sew close to the edge. You could also hem with bias tape or an overlock stitch, but whatever method you choose, do it before you gather and sew it.

After all your tiers are gathered and sewn together, sew the side seams with a 1/2" seam allowance. STOP and backstitch just before you get to the waistband casing.

Take 1/2" elastic and wrap it around your subject's waist and cut the length you need. Then feed the elastic through the casing and sew over it, closing the opening of the waistband and securing the elastic in place.

That's it! Easy peasy!

Here is the skirt on my subject. She liked it so much, she wanted to wear it UNDER her dress.


And 30 seconds after the above photo was taken, the skirt was placed here.

*sigh*

Tuesday, July 21, 2009

Stitchin'

Decided to make use of some of Joel's t-shirts by refashioning them into wicked cool skirts. Here's the first one: He had this shirt for at least ten years, if not longer. I cut it off just below the sleeves, measured it to fit my waist, resewed the side seams on an angle to the outer corners and then made a casing for some 1/2" elastic at the waist. Easy peasy!

The front of the skirt, which used to be the back of the shirt:

The back of the skirt, which used to be the front of the shirt:


From the side:


Yes, I am wearing rain boots -- a true fashionista, I know!

Coming next: an Ozzy t-shirt-turned-skirt. And if I am brave, I'll refashion his jeans into a skirt. Just not sure if my machine can handle two-plus layers of denim.

Tuesday, June 2, 2009

Hershey Park - 1, Buckey - 0

We went to Hershey Park for the first time on Saturday. Addie decided that she wanted to go to the Boardwalk and swim even though the air temperature was only 70 with a fair wind. Anyway, we packed up all our swimming stuff and headed over. Addie was all about the water despite blue lips, goosebumps and the little bastards hitting us right in the face with the water guns. (That only happened once, I can assure you.) Addie had a great time, as evidenced here:

Buckey wanted almost nothing to do with the water, but finally we convinced him at least to stand around the perimeter of the water, so we could all sort-of be in the same place. They had some beach chairs around the zero-depth water and it appeared that Kiefer was trying to climb onto one just as Chris and I switched duties (he to swim with Addie and me to try and get warm and herd Buckey.) Since the chairs are only 6 inches off the ground and do not fold, I didn't try to stop him. He had both hands on the back of the chair and had just put a knee on the seat when it started to tip in ever-so-slow motion. I stepped over to him just as he hit the ground and uttered a horrendous scream. I was surprised that he was crying so hard, and chalked it up to he a) hated the water and b) hated every place where he could see the water and c) falling down just cemented his resolve to get us the hell out of there.

Anyway, I scooped him up right away with a quick look at his face to make sure he didn't bite his lip or scrape his face. Nope. He put his head into my shoulder and tucked both hands in between us and screamed and screamed and screamed. I decided he really was hurt and so I pulled away from him so I could look him over. He lifted his right hand out from between us and that's when I saw the blood and something white hanging loose.

Oh shit.

Luckily, I am pretty solid in a crisis, so I checked it closely and the result of Buckey's mishap with the sun chair was the complete dislodge of the middle fingernail of his right hand. I don't mean most of was torn away. I don't mean it had bent back and loosened from his nail bed. I mean the entire fingernail was torn out from the root.

Oh shit.

He's still screaming. I wrap his finger in a fold of the towel, quickly walk over and tell Chris that Buckey lost a fingernail and then headed out to the closest First Aid Station. There is a chance that I ran over a few small children on the way.

He screamed like a siren all the way there, but stopped suddenly when he was descended upon by two EMTs and a nurse. They cleaned his finger and wrapped it up while the nurse filed an incident report and before he was done, Buckey was the proud recipient of two cheap stuffed dogs -- one for himself and one for sister. *(On a side note, just to illustrate how completely sweet and adorable is Buckey: He's kind of crying when they're working on him and his finger no doubt hurts like bloody hell. But one of the techs handed him this little stuffed dog and he grabbed it with his free hand, hugged it tight with a sound like, "Awww...", kissed its little nose and patted its back until they were finished working on his finger.)

Here's the First Aid Station we visited. This photo was taken AFTER the incident.

Here's Buckey with one of the first aid pups.

Here's his finger approximately 20 minutes after the incident. I re-wrapped it once we got to the car.

I cannot bring myself to take a picture of his finger the way it looks now. However, it doesn't seem to bother him anymore and today was the first day that he didn't seem to mind it without a bandage.

Here's to hoping that this does not color further interactions between Buckey and Hershey.